Saturday, April 27, 2024

React - You should avoid passing object as a prop

Consider these two objects:


obj1 = {


    fname:"Arun", 


    lname:"kumar"

}


obj2 = {

    fname:"Arun", 

    lname:"kumar"

}


Are these equal? They are not!


That's why in React, it is advised to avoid passing an object as a prop in components. If you do, the component will re-render even if you change nothing in the prop values!


 In React, it is recommended to avoid passing an object as a prop in components. If you do pass an object as a prop, the component will re-render every time the object changes, even if the changes don't affect the component.


<Component user={obj1} />  => unnecessary re-render


<Component fname={obj1.fname} lname={obj1.lname} /> => re-renders only when fname or lname has any changes compared to its previous value.

Tuesday, September 15, 2020

How to Push or Pull Drupal data to/from Salesforce Org

There were occasions that we need to pull/push data from our Drupal site to/from Salesforce. Here I'm explaining the complete steps to do that. Please note I'm collecting and presenting information from different sources. I'll include the reference links at the bottom of this blog post. I'm a lazy writer and for getting the latest updates on the things you should visit the reference links-they hopefully have the lastest and correct info.

I assume you have below things ready with you

  • A Drupal application with admin access
  • PHP & Composer installed
  • Git/OpenSSL installed
  • A working salesforce org ( or Developer org or Trailhead playground)
So we are starting our journey....

Step1: Download and Install a contributed module named Salesforce Suite  which supports Drupal-Salesforce Connectivity

Go to https://www.drupal.org/project/salesforce and download the latest module using the composer or manually download-extract and paste. I suggest the composer method, the latter requires more effort and the dependencies will not get added automatically if you choose manual. The below is the composer command to install the latest version at the time of writing this post 

composer require 'drupal/salesforce:^4.1' 
or simply
composer require drupal/salesforce


Step2: Enable the Salesforce mapping modules

From step1 we will get some modules related to Salesforce available in the Drupal environment. From these at least enable salesforce_mapping and salesforce_push. These modules will allow us to map the fields and pushing data from Drupal to Salesforce. You also can enable the modules like salesforce_pull etc.,

Step3: Create certificates

You need to create a Key and Certificate file for later use. use the below command to create a Key and Certificate.
openssl req -newkey rsa:2048 -nodes -keyout key.pem -x509 -days 365 -out certificate.pem

Note: this certificate has nothing to do with your web server's secure certificate. Just generate a new one certificate like this, specifically and only for the Drupal/Salesforce connection.


Step4: Go to your Salesforce org and create a Connected App.
Log in to your salesforce org and follow the below steps to do the same.
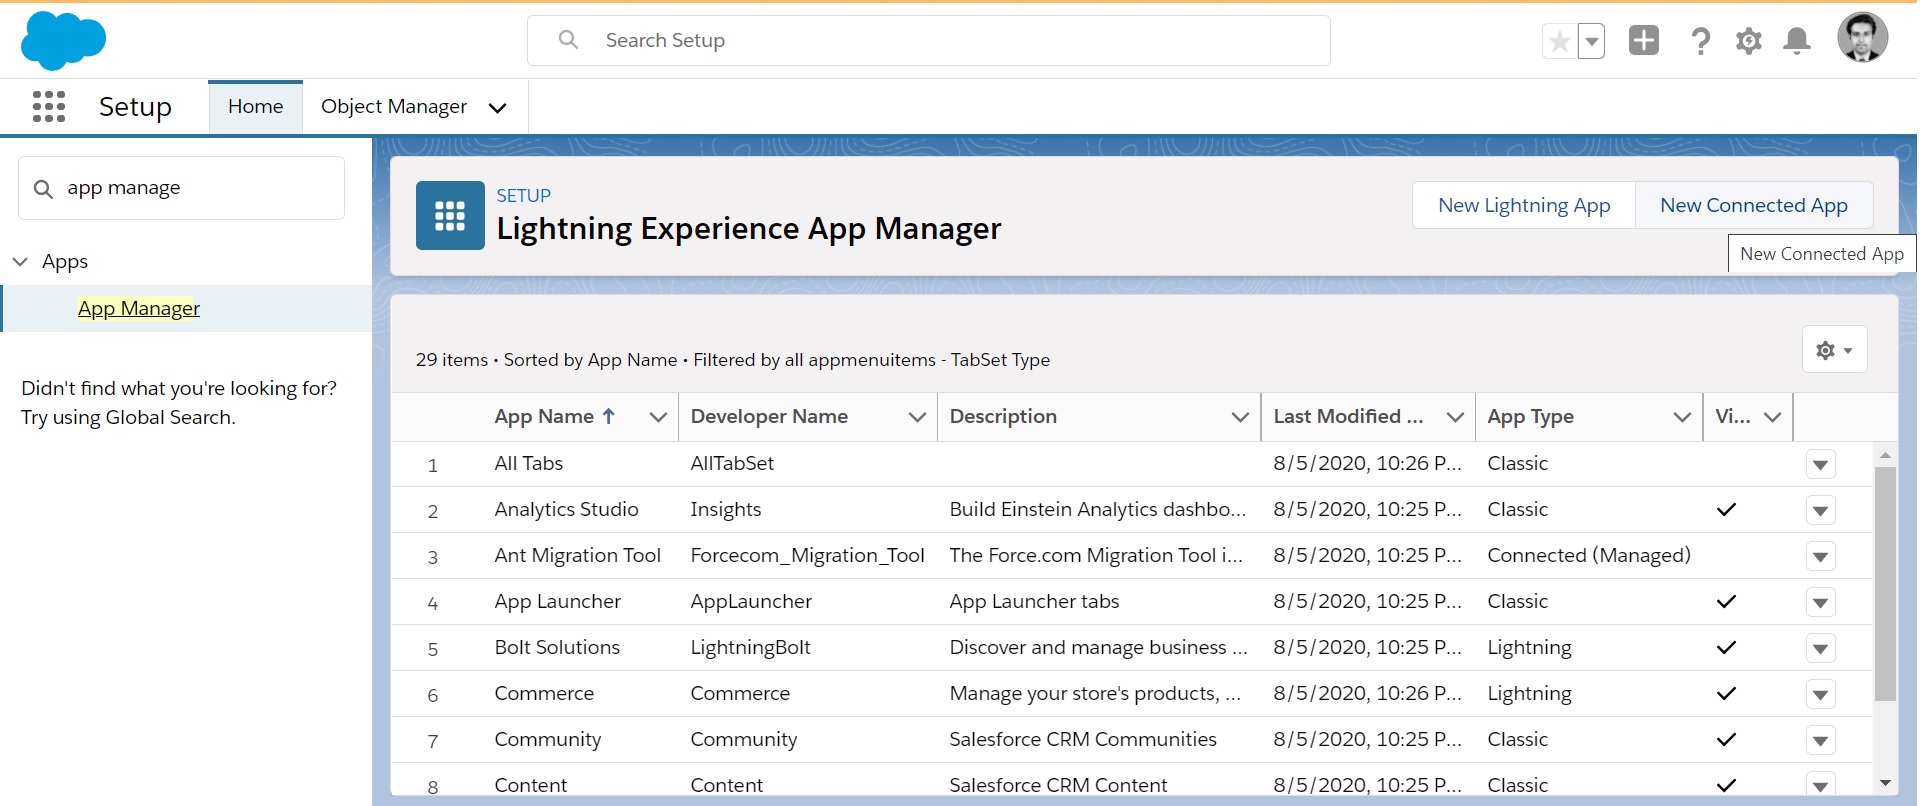
Go to setup
In the quick find box type "App Manager" - click App Manager
Click 'New Connected App"
Give the new app a name, contact email


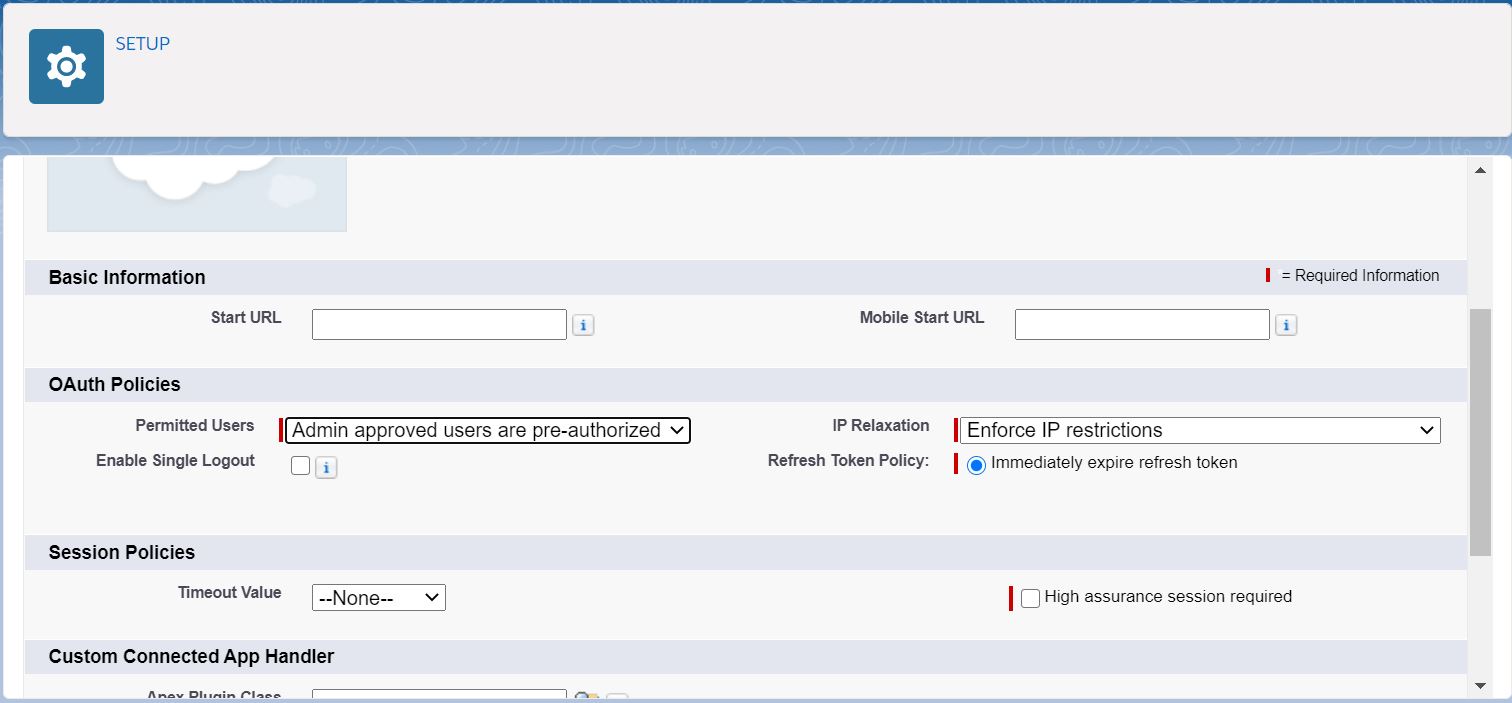
check "Enable OAuth settings"
A callback URL is required, but not used. Enter any "https://" URL to your site
check "Use digital signatures"
Upload your certificate.

Grant "Selected OAuth Scopes":
Select at least "Access and manage your data (API)" and "Perform requests on your behalf at any time (refresh_token, offline_access)"
Select any additional scopes your application may require.
Save your new app


The resulting page will display a consumer key you'll need to complete your Drupal config. Copy this key to paste into your Salesforce settings.


From the app page, click "Manage"
From the manage page click "Edit Policies"
From "Permitted users" select "Admin approved users are pre-authorized"
Save OAuth policies


From the manage page scroll down to "Profiles" and click "Manage Profiles"
On the "Application Profile Assignment" page, choose the appropriate profile for the user(s) who will need JWT access from Drupal.
Save profile assignments.


Step5: Back to Drupal and build the bridge using the Key and Consumer Key

Create a new authentication Key using key module. Upload the key from Step3.


Add a Salesforce JWT Provider
Navigate to Admin ->Configuration -> Salesforce -> Salesforce Authorization (http://DRUPAL_ROOT/admin/config/salesforce/authorize)
Click "Add Salesforce Auth Provider"

Select an auth provider "Salesforce JWT OAuth"
Paste your consumer key here(Refer Step4)
Enter your username for the user authorized to perform API requests
Enter the login URL (https://login.salesforce.com for developer sandboxes and production org, https://test.salesforce.com for sandboxes)
Choose the key created in step 1 and  Save


Go back to http://DRUPAL_ROOT/admin/config/salesforce/authorize, and assign your new JWT OAuth provider as the default(Or you can make it as default by creation stage itself by checking the checkbox near the save button).

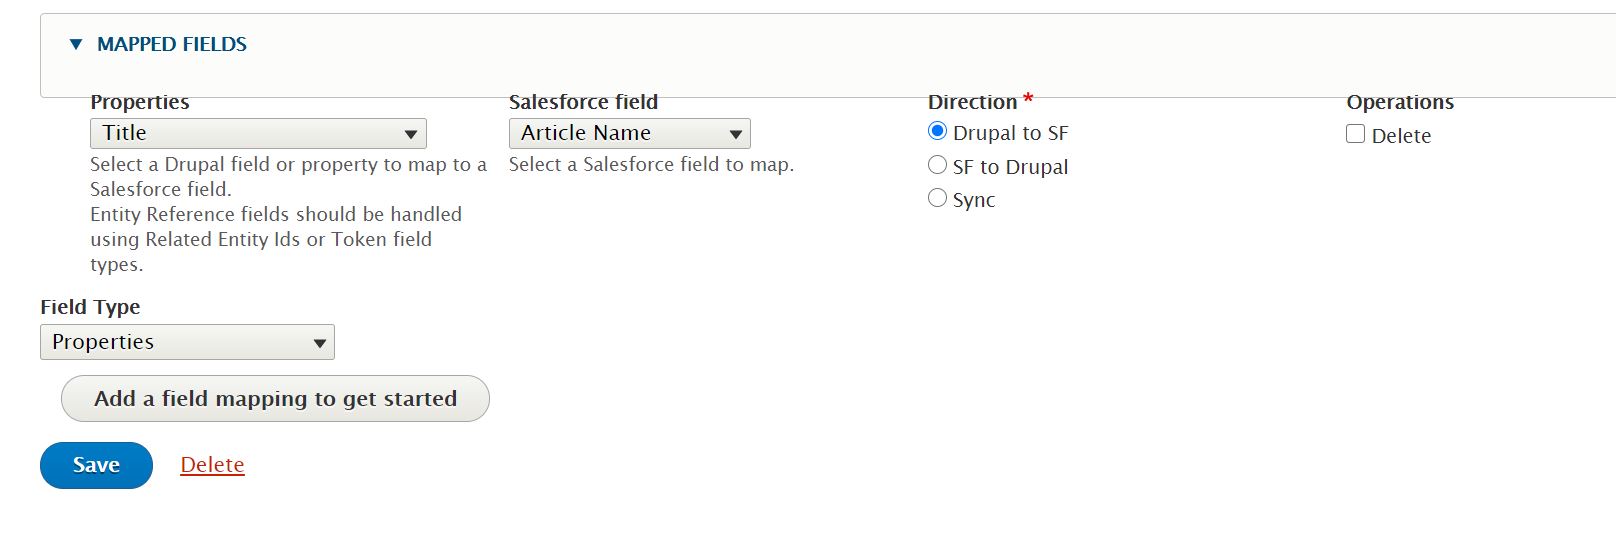
Step6: Map the Drupal fields with Salesforce Object and its fields

Go to Admin -> Structure -> Salesforce -> Mappings ( http://DRUPAL_ROOT/admin/structure/salesforce/mappings ) and create some mappings to get started.

For example, here I'm mapping Article Content type to Article custom object.


That's it! Now you can see the data is available in SF! 


References: 


Monday, May 4, 2020

Speed comparison between HDD and SSD (YouTube Video)

This video shows you how faster a Lenovo Ideapad s340 which is having SSD boots compared to an HDD Samsung laptop. SSD vs HDD / Booting Speed of Lenovo Ideapad S340 An SSD is flash storage and has no moving parts inside. SSD storage is much faster than its HDD equivalent. HDD storage is made up of magnetic tape and has mechanical parts inside. They're larger than SSDs and much slower to read and write #aksAviyalVlog #lenovoS340 #ideapad #S340 #budgetLaptop #SSD #highPerformance #bestLaptop #lightWeightLaptop #SSDvsHDD

How to convert an Internal HDD to Portable Hard Disk

This video explains converting an Internal Desktop SATA HDD to Portable external HDD. To buy the case : Check this out at Amazon.in Terabyte 2 in 1 USB 2.0 External Hard Drive Casing (Black) https://www.amazon.in/dp/B06XNQWJ21/ref=cm_sw_r_other_apa_i_LFzQEbMG7KCY6 #aksAviyalVlog #technology #hddtoexternal


Wednesday, May 8, 2019

Mapping aditional attributes coming from SimpleSAML ADFS


For example , consider if ADFS SSO giving additional parameters like first name, surname, job title, etc., so how we map these additional attributes?
The 'simplesamlphp_auth' module gives us the option to map username, email, etc., from its user sync configuration page, buts it's not sufficient to map all fields. So here I would like to mention a way to map the additional fields.

There is a hook available for this.

hook_simplesamlphp_auth_user_attributes

I have a module named general in my code path. So I will write the above hook like below.

<?php
/**
 * Mapping of additional parameters/SAML attributes to Drupal user profile fields.
 * @param \Drupal\user\UserInterface $account
 *   The Drupal account/user
 * @param array $attributes
 *   The SimpleSAMLphp attributes for this account.
 */

function general_simplesamlphp_auth_user_attributes(\Drupal\user\UserInterface $account, $attributes) {
  $first_name = $attributes['http://schemas.xmlsoap.org/ws/2005/05/identity/claims/name'];
  $sur_name = $attributes['http://schemas.xmlsoap.org/ws/2005/05/identity/claims/surname'];
  $job_title = $attributes['http://schemas.xmlsoap.org/ws/2005/05/identity/claims/jobtitle'];

  $account->set('field_first_name', $saml_first_name);
  $account->set('field_last_name', $sur_name); 
  $account->set('field_job_title', $job_title);
  return $account;

}
?>

SSO Implementation using SimpleSAML - in Drupal


A great tutorial here : https://www.chapterthree.com/blog/how-to-configure-simplesamlphp-for-drupal-8-on-acquia

After successfully setting the library and modules you have to send the metadata to the ADFS provider.
They will send you an XML adfs metadata.
You need to convert the XML metadata into PHP array, for that please go to the simplesaml configuration page. Which is normally http://www.examplesite.com/simplesaml
Go to Federation tab
Click the link labelled 'XML to SimpleSAMLphp metadata converter'. Which will ask you to log-in(if you are not logged in)
Paste the XML metadata/or upload the XML file here and click parse, you will get the required PHP array
Copy and paste the content in /simplesamlphp/metadata/saml20-idp-remote.php

Monday, February 25, 2019

Content export to CSV, JSON or XML

1. Download and install Views Data Export Module (https://www.drupal.org/project/views_data_export)

If you are using composer to install the module, then all the dependencies will automatically be downloaded.  Otherwise, follow the below steps

1.a. Download and install the CSV Serialization module(https://www.drupal.org/project/csv_serialization), this module requires a library League\Csv. So if you trying to install this module you may get below error message

CSV serialization requires the League\Csv library.


1.b To fix the above issue, download and install Ludwig module (https://www.drupal.org/project/ludwig) It provides a manual alternative to Composer.

After installing Ludwig, go to reports > packages.

Follow the instructions mentioned on that page. You may be instructed to download the library and copy to a specified folder. Do as per that then,

1.c Install CSV Serialization and Views Data export modules respectively.

After successful installation,

Follow the instruction mentioned here (https://www.drupal.org/node/1820452).